
The holiday season is upon us! All moms want to deck the halls with beautiful crafts made by the tiniest hands in their home, but want it to be easy. No, not want – need – moms need easy! We need the “craft of least resistance,” if you will. Well, easy crafting is what I’m all about at Smocks Paper Scissors. So I’m here to show you how your child, of any age and skill level, can make beautiful crafts, with only the essentials. In my previous article, “Paper Plate Create,” I used the simplest of materials, the Dixie Plate, to create a variety of unique holiday crafts, I’m here to show you once again how to put that paper plate to good use. So let’s get started.
ANGEL TREE TOPPER

This craft makes for a beautiful tree topper, table top decoration, or place setting card for your holiday meal. Once completed. the opening in the middle of the finished product can slide right on top of your tree! A multi-purpose craft, with minimal materials, your child will be so proud of this 3-dimensional creation.
MATERIALS:
A ridged paper plate
A pencil
Watercolor paint (any paint is fine, watercolor is extra “angelic” looking in my opinion)
Scissors
Glue
Glitter (optional)
DIRECTIONS:
- Take your ridged paper plate, draw a dot on any of the ridges. From that point, count 13 ridges, and draw a point on the 13th ridge. Draw a winged line down from the first point toward the center of the plate, stopping before to get to the actual center. Loop your pencil up, to create a circular shape (the head), and do the same with your second point. You are left with the tops of two wings, and a head shape.
- Cut along the lines you drew.
- Beneath the winged lines, cut a slit that is about 2” deep.
- Have your child paint the plate with any colors of their choosing.
- Optional: they can also adorn the plate with any special details – stick on gems, stickers, tissue paper, glitter etc.
Have your child add facial features and hair. Paint, marker, googley eyes, and yarn all work great. - Once dried, simply fold back the two points of the plate where you had previously cut the 2” deep slits.
- Staple them together, and you have created a beautiful angel!
PAPER PLATE CAR
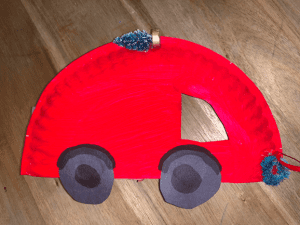
True story: this is the tree topper to my son’s personal miniature Christmas tree. His two big sisters (ages 5 and 3) created the Angel Tree Toppers for their trees and his was left bare. He loves cars – I mean, LOVES cars – every ornament on his tree is of a car. So naturally, I thought up ways to incorporate the theme of his tree. I came up with this plate version which is just so simple. Unlike the angels, which naturally lend themselves to becoming a tree topper with the opening in their middle, the car was 2-dimensional and did not offer that same purpose. So I got creative: a toilet paper roll. I simply taped a toilet paper roll onto the back of the car, and it transformed from a 2-dimensional red car, into a 3-dimensional car tree topper! So simple to do, here’s how:
MATERIALS:
Paper plate
Black construction paper
Red paint (any color works!) and paintbrush
Scissors
Mini Christmas tree & wreath / OR / green construction paper
DIRECTIONS:
- Cut your plate in half.
- Cut an opening on either side, to represent a window.
- Have your child fingerpaint or use a paintbrush to paint the entire half-plate
- Cut out two circle son black construction paper and glue them onto the bottom of the car once it has fully dried.
- Glue the miniature tree and miniature wreath on top and front of the car. If you don’t have these materials, a drawn out tree and/or wreath works great on green construction paper.
- That’s it, you’ve got a car that looks like it is on it’s way home from the tree shop! If you’d like to make this into a tree-topper, simply table a toilet paper roll onto the back and voila!
PAPER CHAIN SNOWMAN

Is there a more classic holiday craft than the paper chain? We’ve made these in alternating colors, red and green for Christmas, blue and yellow for Hannukah, pink and red for valentine’s day, the list goes on. But turning this classic craft into a snowman is extra festive for the holiday and winter season. It’s easy enough for a child of any age to do. My 5 year old was insistent on creating hers to be the length of her whole body, and so we turned this craft into a homeschooling activity where each child measured the other and they determined how many “chains” tall they were. Here’s how we did it:
MATERIALS:
White and Black construction paper
Scissors
A ruler
Black & Orange markers
Glue
Buttons (pom poms/dot markers/dot stickers/marker are all great substitutes)
DIRECTIONS:
- Cut the white paper into even strips of about 2” width. The number of strips you will need will depend on the height of your child if you are following my daughter’s lead to make them the length of each crafter. But make this snow-person as short or as tall as you wish!
- Have your child place glue onto the inside end of one of the strips, and place that end, glue side down, onto the opposite end of that same strip. This will create a circle.
- Have your child take another strip, and insert it into the circle, and follow the above directions to glue each end onto the other. Repeat this step to your desired length.
- Once your snowman is the height you’d like it to be, add features! Glue buttons down it’s body, use your orange marker to give it a carrot nose, and your black marker to give it it’s eyeballs and smile
- Draw and cut a circle onto your black construction paper, as well as a small rectangle. Glue the rectangle on top of the circle, and then glue the circle on top of the snowman’s “head.” This is the snowman’s hat!
- Get as creative as your child’s imagination allows, add a scarf, arms. Make it Olaf! There is snow wrong way to do this : )